Dahl (Indian Lentils) with Spinach

I made this the other night, and it was crazy-yummy. We’ll be having this on a regular basis. It’s creamy with just enough heat to keep it interesting.

1 1/2 cups red lentils
1 tsp ground cumin
1/2 onion, chopped
1 tsp mustard
2 cups broth
2 cups water
1 tsp salt
1/2 tsp turmeric
1/2 tsp cayenne pepper
1/2 tsp ginger
1/2 lb spinach, roughly chopped
3/4 tsp garam masala
1 cup coconut milk

1. Rinse lentils and soak for 20 minutes, and then drain.

2. In a large saucepan, bring broth to a boil and stir in salt, lentils, turmeric, cayenne, and ginger. Cover and return to a boil, then reduce heat to low and simmer for 20 minutes. Add more water if the pot starts to get too dry.

3. While the lentils are cooking, spray a skillet with nonstick spray and add the onions, curry, cumin and mustard, stirring often. Cook until onions are transparent. Add the spinach to the pan and stir until the spinach wilts.

4. Add onion and spinach to the lentils. Remove from heat. Stir in garam masala and coconut milk and stir until heated through.

Nutrition Facts
Nutrition (per serving, according to Living Cookbook): 129 calories, 40 calories from fat, 4.8g total fat, 0mg cholesterol, 216.9mg sodium, 305.6mg potassium, 16.3g carbohydrates, 3.3g fiber, <1g sugar, 7.1g protein.

I served it over basmati rice, and served four of us, with three of us having seconds (and almost popping), and then two two-serving freezer containers.  So I calculated the number of servings at 12 – there would be a lot fewer servings if you serve it without rice, of course. Naan would be fantastic with this!
How to Open Difficult-to-Open Jars

When I’ve got a jar that just won’t open, I tap the outside rim of the lid with the handle-end of a butter knife. Most of the time, this will break the seal and I’ll be able to open the jar easily.

If it’s jelly or some other sticky kind of thing, I’ll also run the top of jar under hot water for a minute. Sometimes some of the sticky stuff got caught in the threads, and the heat melts it, enabling it to open!

Another thing to try, if you’re having trouble getting a grip on it, is to wear a rubber glove. It works like one of those rubberized jar openers, except it does double duty when you’re cleaning.

Curried Cauliflower Recipe

When I was shopping at our local Sunflower Market the other day, the cauliflower looked so lovely – and was on sale for cheapcheapcheap. So I bought a head to have with our tandoori chicken and naan that evening. I decided to make curried cauliflower, and it was delicious.  Two of my kids declared it “the best cauliflower ever!”

1 tablespoon olive oil
1/2 onion, diced
1 teaspoon curry powder
1 teaspoon kosher salt (divided)
1/2 teaspoon turmeric
1/2 teaspoon cardamom
Pinch of cayenne
1 head of cauliflower, cored and cut into bite-size pieces
1 15-oz. can coconut milk
1 cup chicken or vegetable broth
1 tablespoon cilantro, chopped (plus some sprigs for garnishing)
1/2 cup golden raisins (optional)
1 cup frozen peas (optional)

Heat the oil in a large skillet over medium heat. Add the onion and half the salt, and cook until golden, about 8-10 minutes. Add the rest of the salt and the spices and stir for a minute, and then add the cauliflower, coconut milk, and broth. Cook uncovered until the cauliflower is tender, about 15 minutes. Increase the heat and reduce the sauce until it coats the cauliflower. Stir in the cilantro. Stir in the raisins and peas, if using, and let heat through. Garnish with sprigs of cilantro.

We skipped the raisins and peas because… well, because we really dislike raisins. And I forgot to buy peas.

This actually makes a good meatless dinner, as well as a side dish. And it’s yummy, and inexpensive – and wayyyy less expensive than eating out. I love that I can introduce my kids to a lot of different cuisines, especially since two of them want to be chefs.

Naan (Indian Flat Bread) Recipe

With our Indian dinner the other night, I made naan to go with the chicken tandoori and the curried cauliflower. It’s my favorite part of dinners at Indian restaurants, and I didn’t know until I started making it and told a few friends that apparently, it’s difficult to find a good naan recipe. I took a little from here, a little from there to make it. I guess a combination of knowing my ingredients, remembering vividly what naan at the restaurant tastes like, and a good amount of luck was at play, because my naan was fantastic. And not so difficult!

2½ tablespoons instant yeast*
1 cup warm water
1/4 cup sugar
1/8 cup milk
1 egg, beaten
2 teaspoons salt
4½ cups all-purpose flour
1/4 cup butter, melted

In your mixer’s bowl, mix everything but the butter and then knead with the dough hook for 5 minutes (or knead by hand for 8 minutes). Put the dough in an oiled bowl, cover with a towel, and set in a warm place to rise until doubled in volume (about 45 minutes to an hour).

Punch down the dough and form into golf-ball sized balls. Place on a cookie sheet and cover with a towel, and let rise until doubled (about half an hour).

Preheat a large skillet to medium heat. Lightly oil the skillet (I used nonstick spray).

Just before cooking each ball, flatten it out to a very thin disk. You can use a rolling pin or your hands, but the thinner it is, the bubblier it will be. Put the dough disks in the skillet (I could get three at a time). As the bottom browns (just 2 minutes or so), brush the tops with the melted butter. Turn and brown on the other side. You only want the raised parts brown – let the rest stay white.

Wrap the naan in aluminum foil to stay warm until dinner.

* If you are using active dry yeast or rapid rise yeast, mix the warm water, sugar and yeast together first and let it sit about 10 minutes, until it’s foamy and puffy. Also, that’s about a packet.

I would have loved to try this and the chicken on the grill – but I don’t have one! I hope to remedy that this summer.

For dessert, I heated up some butter in a frying pan, briefly warmed the naan in the butter, and sprinkled it with cinnamon sugar. YUM!

My New Hobby : Do-It-Yourself

Being a Single Mom, I don’t have a ‘guy around the house’ who could indulge himself in a bit of DIY to fix all those little maintenance annoyances. So I have had to strike out on my own into this male-dominated past-time. This is where the internet is invaluable. You can learn just about anything when it comes to…well, anything! So as any aspiring DIY-er knows, it’s all about the power tools…arr, arr! And I have learnt a great deal over the last few hours of researching how to use them to sort out some pretty common house maintenance problems, so very soon I will need to take a trip to my local Home Depot to get myself all geared up. However, one problem I have been struggling with is what sort of power system to power to tools should I invest in : electric or air-powered. Certainly, electric-power tools seem to be the easiest solution, but on the other hand, air-powered tools are less expensive particularly if you are going to need a bunch of them because they can all run off the same ‘power’  from the air compressor, which has ultimately sold me on the ‘air power’. But if you are like me, and are struggling with your decision on which air compressor to buy, then once again, the internet to the rescue, in my case I found this air compressor review site to be particularly well thought out. Happy DIY-ing!

Healthy Apple Crisp

One of my favorite things to eat is an oatmeal-based apple crisp. My favorite flavor in the world is cinnamon, and there’s nothing better with cinnamon than oatmeal and apple, right?

I wanted a treat tonight, and we had some apples to use up before they went bad, so this is what I decided to do with it. It was a definite hit with the kids, too.

I did all the mixing in a zip-top bag, so the only things to wash are two measuring spoons, a measuring cup, and the pan. It took all of 10 minutes to throw together.

5 Granny Smith apple, thinly sliced
1/2  tsp cinnamon
2 tsp sugar
1/4 cup all-purpose flour
3/4 cup quick or old-fashioned oats
4 Tbs brown sugar
1/4 tsp salt
1/2 tsp cinnamon
1/4 tsp ground ginger
1/4 tsp nutmeg
1/4 cup butter, melted

Preheat the oven to 350°. Spray an 8×8″ baking pan with nonstick spray.

Mix the 1/2 tsp. cinnamon and white sugar in a large ziplock bag. Add the apple slices and squish around to coat. Spread the apples in the pan.

In the same bag, mix the remaining ingredients and spread across the top of the apples.

Bake at 350° for 25-30 minutes, or until apples are soft and topping is crispy.

Servings: 9

Nutrition (per serving): 176 calories, 54 calories from fat, 6.2g total fat, 13.6mg cholesterol, 68.1mg sodium, 152.9mg potassium, 29.1g carbohydrates, 3.5g fiber, 14.9g sugar, 2.8g protein.

This was tasty as-is, but I think it would be to die for (although a bit higher in calories) with vanilla ice cream!

(And here I am labeling something “healthy” when what I mean is that it’s homemade, low in calories, and has fruit and fiber in it. I really hate the designation of “healthy” being applied to things because they are low-calorie — it’s one of my pet peeves, and here I am doing it. I will work on a different title for this recipe when I’ve had some sleep.)

A fruit bowl that WON’T function as a mixing bowl!

I was at a loss for a subject for “Works for Me Wednesday” today, so I asked my 15 year-old daughter. She had a quick answer: “A fruit bowl that can’t be a mixing bowl!”

You see, every time I buy a nice fruit bowl to put out on our kitchen island, I end up snagging it for a mixing bowl. And then I end up with no place to put the fruit – which apparently really annoys my daughter!

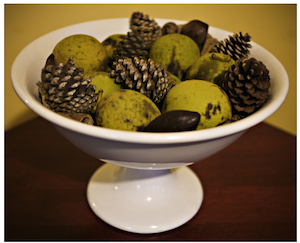
Recently I was in a TJ Maxx store, and saw this:

fruit_bowl

which I bought as it fitted my idea of a true fruit bowl. It turns out that my daughter was right because today I needed a mixing bowl and since this was empty I tried to use it for this unintended purpose. As you can imagine, things did not go smoothly (pun not intended 🙂 ), and I soon had cake mix all over the kitchen table as it constantly toppled over … should have bought a mixing bowl that also functions as a fruit bowl instead!

Shaving Tip

Yes, another shaving tip! I remember telling this to my younger daughter, and my older daughter exclaiming, “Hey! You never told ME that!”

When you shave your legs, you shave against the growth of the hair, to get a closer shave. Your underarm hair, however, grows in every direction – so you should shave your underarms in all directions (up, down, left, right, and even diagonal), to get a closer, smoother shave.

Ham and Lentils Slow-Cooker Stew Recipe

I love this stew – and I love that I can cook it in my crockpot and not heat up the house!

1 lb dried lentils
2 cups fat-free chicken broth
5 cups water
1 large onion, chopped
1 cup cooked ham, diced
3 carrots, diced
1 tsp dried rosemary, crushed
1/2 tsp rubbed sage
1/4 tsp pepper
3 garlic cloves, minced
2 bay leaf
1 tsp salt

Put everything except the salt into a slow cooker. Cook for 3-4 hours on high. Salt before serving.

Servings: 8

Nutrition Facts
Nutrition (per serving): 258 calories, 16 calories from fat, 1.8g total fat, 9.6mg cholesterol, 686.1mg sodium, 790.1mg potassium, 40.9g carbohydrates, 19g fiber, 4.2g sugar, 19.9g protein.

It also is very low-calorie and frugal. It’s a win-win-win meal!

Menu Plan from June 27 to July 3

Doodle’s out of town visiting  her paternal grandmother for the next two weeks, so it’s just me and the boys. For snacks, we’re going to get our fill of raw bananas, nuts, broccoli, and carrots, so she won’t have to watch us eat them in front of her when she gets back! (The boys don’t have any food allergies.)

And on to our dinner menu:

Sunday: Ham and lentil stew

Monday: Black bean burritos

Tuesday: Macaroni and cheese and green beans

Wednesday: Sushi and birthday cake and banana “ice cream” (X-man’s birthday)

Thursday: Kids will be spending the night at my mom’s – I’ll eat leftovers

Friday: Boca burgers, baked beans, carrots

Saturday: Chicken of some sort

These dinners are all quick to cook, because it’s HOT, and I don’t want to heat the house up any more than we have to. We will be taking time to make sushi for dinner on Wednesday, though, and I’ll be baking a cake (probably in the middle of the night, so it won’t be as hot) for my youngest’s 11th birthday.

I hope this plan works, because the heat is really getting to me this year – and it’s only June (barely)!